Blue vs Green Coolant- Fight!

By Dennis Haynes

To begin I wish to apologize for not keeping up with the list and this discussion. I have been a bit busy and this topic seems to get attention like oil and tires. There is just a lot of information out there and probably the best feature of many products is the advertising.

For my experience I have dealt with cooling systems and water treatment for vehicles and numerous industrial systems. The good, bad, and sometimes ugly. I have been amazed how truly de-ionized water can discolor (rouging) stainless steels.

I have been working on VWs since about 1974 and grew up with the introduction of the VW water cooled stuff and even owned some Sciroccos and an 81 Rabbit convertible before getting into Vanagons. Back in the day due to advertising and perceptions most everything got Prestone Green Stuff. Except for an occasional water pump I never knew I had an antifreeze choice problem. Even my first Vanagon, an 84 GL passenger that I purchased about a year old got the green stuff after a water pump change. I sold it at 96K as I needed $$$ to help acquire Fun Bus. That was February 1988.

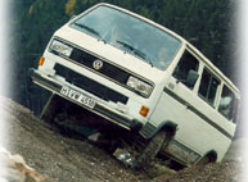
So let’s talk about Fun Bus! Yes I still have it and lately been using as a daily driver. I am hoping to get it to 350K. I have less than 38K to go. While I have had to do a number of transmission repairs, (Broke 4th gear twice 3-4 slider hub, and a pinion bearing), the engine has never been opened. Currently you can tell where it was parked by the Mobil 1 dripping from the crankshaft seals, (both now), but it still has proper compression, good oil pressure, and the antifreeze leaks now are mostly the heater cores. I did have to replace the valve covers a few years ago as they rusted out enough to leak. Also, once the Vanagon lifter clatter let the push rod fall out the rocker socket for intake valve cylinder 1. However the heads have never been off.

How often do I change antifreeze? Not very. It seems that during “condition based” maintenance there is always a reason to open the cooling system more often than modern antifreezes need to be replaced. Unlike lubrication frequent additions, top offs, and even excessive coolant changes is not a good thing. Why, when you add fresh coolant or water you are adding fresh oxygen. If you have leaks you are also losing fluid but leaving the bad stuff behind and overtime the bad stuff gets concentrated. So the most important part of cooling system maintenance is to not have leaks. In theory the only loss you should have is evaporation from the recovery tank.

The science! I am sure some folks here have home heating systems with radiators or baseboards. Cast iron boilers, copper pipes, valves with steel parts, etc. They all last for 20 to 30 years and there are no additives used all. Fill the system, let the oxygen purge out, metals or whatever reach equilibrium and the stuff is just there.

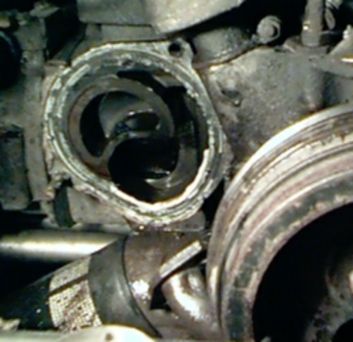
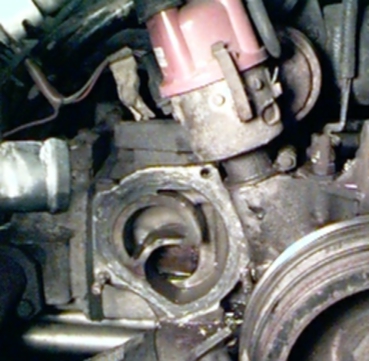
Now let’s look at the Waterboxer head gasket failure from corrosion problem. For all those that have worked on these and seen the corrosion on the head and also on the case where the gasket sits have you noticed that the corrosion is only in that area? Well, at that point it does not matter the choice or age of the coolant! The gasket (sealant) was failing long before the corrosion.  That’s right. If the gasket seal was good the antifreeze wouldn’t be there. However, once it is there the heated coolant mixture mixes with air and the corrosion process begins.

So now let’s talk about antifreeze types. Back in 1999 I purchased a new motor home. Ford chassis with the Triton V-10 engine. There were numerous stickers near the coolant tank warning to use only specified fluids and NOT to use Dex-Cool. This took me by surprise. After all Dex-Cool was the long life antifreeze darling at the time. My antifreeze education was about to begin.

Fast forward to 2004 and the motor home gets upgraded to one with a Cat Diesel. Diesels it turns out have a whole different bunch of requirements. So I got to learn about cylinder cavitation erosion and all the additives or special antifreezes that deal with that. Also the need for longer life requirements and less abrasives to extend water pump seal life and reduced internal wear of really expensive radiators and stuff.

OK so back to my experience. Of all the engines and cooling systems I’ve worked the coolants that seems to leave the nastiest stuff inside an engine include Dex Cool and the Blue stuff. The Blue stuff is an older technology and I just don’t see a real advantage of it.  Dex-Cool seems to only work in systems designed for it. Flow velocity has to be part of that system design. As I truly like to reduce maintenance requirements (lazy) I became intrigued with the long life solutions used in the large Diesels and industrial uses. The state of the art for these applications include coolants such as Global Final Charge. These are 6 year, 600,000 mile coolants that only require an additive update at the half life for the cylinder cavitation prevention. These coolants also have great “wetting” abilities which improve cooling performance. The only real downside is that with the lower surface tension if there is a chance for a leak there will be one. Using these in the vanagon seems to also have another benefit, extended water pump life. Since these coolants rely less on abrasives for corrosion control water pump seal life is greatly extended.

Fun Bus and most of my customers now run on this. I also do use the pre-mix. It is convenient and I end up with a more consistent mixture. Yes, there is more cost for the “water” part but I know the mixture is correct. Also for winter fill, I have seen the water and antifreeze fills not get mixed enough and cause freeze damage. Especially if a fill is done and you can’t get the engine running long enough to really get the coolant mixed.

As for adding a wetting additive such as “Water Wetter” these high performance Diesel antifreezes have that covered. Like good oils, use the good stuff and additives are not needed.

VW to NAPA Part Number Coolant Hose Conversion Chart

VW to NAPA Coolant Hose Conversion
for many ’86-’91 Vanagons
By Darrell Boehler

This conversion is based upon NAPA brand hoses that were either exact replacements for, or adapted to replace their VW counterparts. The conversion was performed on a 1986 VW Vanagon Westfalia with 2WD, manual transmission, and air conditioning. Your mileage may vary.


Coolant Hoses
Wasserboxer 86-91 2WD


Heater hoses are all 5/8″ hose and no big problems. I replaced the T’s for the rear heater with 5/8″ diameter T’s on all three points because the originals had two 5/8″ and one 1/2″ point. 30′ of 5/8″ hose is needed to replace all heater hoses. Straight hoses will even make the turns for the front heater under the dash without too much problem. However if your inside front heater hoses are good I would consider keeping them as they require a bit of time to replace. I was considering connecting my heaters in series instead of parallel, but backed off because I thought it might degrade the heat. NAPA has regular grade or premium grade heater hose and so do many other stores.

Simple Conversion


Hose:
VW Part #: NAPA Part #: Description: Dimensions:
D N902873.03 1.5″ hose* Valve to radiator feed.
F
251-121-058a 1″ hose* Thermostat housing to valve. 1″ ID about 2ft long
G 443-121-107A This is a 7mm hose from a VW FLAPS, NAPA here doesn’t carry 7mm hose
H 252-121-130b 7990 Right head front to valve.  1″ ID, 6″ long. Has 2 60 degree bends
J 025-121-058e 10050 Thermostat housing to oil cooler pipe .472″ ID one end, other end .635″, 3″ long
K
025-121-058D Oil cooler to oil cooler pipe from from thermostat housing. No direct solution here. However 5/8″ heater hose about 2 feet long can be run directly from the oil cooler to the thermostat housing eliminating the need for hoses J and K. I like the one hose solution better than the normal path as there is more clearance from the oil cooler hose and the header pipe. My hose K got brittle and blew coolant all over my clean engine.
L
025-121-058G Oil cooler to oil cooler pipe from water pump. No NAPA hose replacement and no good way to eliminate this hose that I have found. Maybe someone else can find a sub.
M
025-121-058J 3/8″ ID hose A straight hose will function fine here 3/8″ ID 4″ long
O N901287.03 1″ hose* Water pump feed to right side of crankcase. 1″ ID 3″ long
P
443-121-107A 7mm VW FLAPS. Right head to pipe
Q
025-121-108D No NAPA solution. Pipe at water pump to expansion tank. This hose is designed to take a lot of flexing between the engine and the expansion tank. I need help on this one, somewhere there must be another application that uses a similar hose. 1″ ID one end, 3/4″ ID other end
R 025-121-058h 9807 Expansion tank to pipe tee .620″ ID both ends. 90 degree bend each leg 4.5″ long
S 025-121-058B No NAPA solution. Thermostat housing to pipe tee. Need help on this one also. 1/2″ ID one end 7mm other end, about 14″ long.
? 025-121-073H 777 Thermostat housing to water pump pipe. This hose doesn’t seem to be listed on the chart. Good picture of it in Bentley on 19.11. It is the big one there with the 90 degree turn. 1.5″ both ends 90 degree bend 1 leg 6″ other 4″


* I got a 3ft long heavy duty NAPA hose and cut it to fit

For the rest of the hoses I used copper pipe, 90 degree elbows and various copper pipe adapters. This requires soldering some pretty heavy pipe but could be done with a plain propane torch. I bought NAPA heavy-duty hoses that are used mostly on diesel trucks and industrial applications. This was a mistake I would go with regular grade hoses if I did this again. The heavy-duty hoses has double layers of nylon reinforcement and outside wrapped with nylon. It is a real pain to work with and after a couple of days working with them I discovered why most Illinois diesel mechanics appear to be fresh off the Minnesota and Wisconsin farms. I used 6′ of 1.5″ ID hose, 3′ of 1.25″ ID hose, 3′ of 1″ ID hose. Most 1″ stuff was used in the previous table on F and O.

Complex Conversion


Hose: VW Part #: NAPA Part #: Description: Dimensions:
A 251-121-082 1.5″ and 1.25″hose Upper radiator feed hose Radiator connection is 1.33″ and long hoses are 1.5″, straight 28″ long. I used some 1.25″ hose at the radiator end and made an adapter using 1.25″ copper pipe, adapter to 1.5″ copper some 1.5″ copper pipe then 1.5″ hose to the long feeder hose.
B 251-121-083H 1.5″ and 1.25″ hoses Lower radiator return hose Same ID on hose as A above however 3 90 degree elbows are required on this one. Use a short 1.25″ hose, a short 1.25″ pipe, 90 degree elbow toward the rear a short 1.25″ pipe (make this pipe just long enough to get aft of the radiator and radiator holder bracket), 90 degree elbow pointing up and slightly to the left, enough 1.25 pipe to get up high enough to get over the spare tire, a 1.25 90 degree elbow pointing toward the rear, some 1.25″ pipe, an adapter to 1.5″, some 1.5″ pipe then 1.5″ hose to the radiator return long pipe.
E 025-121-062E 1.5″ hose and some 1.5″ copper pipe Return to thermostat housing 1.5″ both ends however this one goes up and over the transaxle. Use a short 1.5″ ID hose about a 2.5 inches of copper 90 degree up, about 10 inches (check this measurement) 1.5″ ID copper pipe up line these up so your copper pipe rests nicely in the hose holder above the transaxle), Now 90 degree copper elbow and you are heading over the transaxle, install enough 1.5″ copper pipe so you line up with the thermostat housing. (hint it is best to be a little too long with the pipe going over the transaxle or your hose might cause shifting problems). Now turn 90 degrees with copper elbow toward the thermostat housing install a short 1.5″ ID pipe in the elbow. use a 1.5″ ID hose to connect to the thermostat housing. That sounds pretty involved, try this for directions from the long return hose go back a few inches up about 10 inches over the transaxle about 20 inches and turn back toward the thermostat. What you end up with is a copper pipe with three 90 degree elbows attached.
N 025-121-058M Gates 20693 hose, home made adapter and some 7mm hose Left head to pipe One end is 1″, the other is 7mm. Start with a Gates 20693 hose (which is a 1″, 90 degree hose). I then used an adapter from my local hardware store from 1″ down to 1/4″ ID copper pipe that I used and then just stuffed the 7mm hose over that. The original hose on my 86 had sprung a leak and for a while I thought I had a head leak. Thanks Malcolm Stebbins.


Water pump replacement for 1.9l Waterboxer Vanagon

By Tom Carrington
I should have known it was coming. The signs were there. I just chose to ignore them. What signs? For the past month or so, I have been topping off the coolant reservoir. Not much, just maybe a pint every couple of weeks. I was kinda worried that I might have a head gasket problem (most Wasserboxer owners live with this constant fear) but there were no drips or puddles in the driveway, or strange smells from the exhaust. The temperature gauge always read fine, so I happily fed my engine’s habit. Life was good.

Or so I thought.

Note: Click on thumbnails for expanded images!

Just a week ago, the habit turned ugly. I noticed a slight smell of antifreeze after parking the van, but still no drips or other visible signs of a leak. I was more concerned, but not enough to fully investigate the problem. I should have. A day later, my Van was leaving a distintive coolant trail along the path I drove. Hansel and Gretel would have been proud. Bottom view of leaky pumpThat night, I got under the Van to assess the problem. With the engine running, coolant was spewing out of a small hole in engine, just behind one of the pulleys. No ordinary hole, coolant from this one indicates that one of the seals in the water pump had failed. My preferred FLAPS (Olympic Auto Parts, College Park, MD (301) 474-1030) had a brand new German-made pump in stock, complete with new gaskets and an O-ring for $62.00. A quick check at The Bus Depot web site showed they had a similar pump for $50.00. Since I needed it *now*, off to Olympic it was! 20 minutes later, I had a new pump. Follow along as I go through the steps for replacement!

Tools & Supplies Needed:

  • 12mm and 13mm wrenches and sockets
  • 3/8″ drive ratchet, 3″ and 6″ extensions and universal joint
  • Screwdrivers
  • Slip-joint pliers
  • Gasket scraper, putty knife or razor blade
  • Sturdy jack and jack stands
  • New water pump (comes with O-ring and gaskets)
  • 2 coolant pipe gaskets
  • 2 gallons antifreeze
  • RTV silicone sealer
  • Large bucket or wide dishpan (To collect old coolant)

    Buried pumpThe worst part about replacing the water pump is it’s location. Down near the heat shield in front of the muffler with not too much room to work. Mentally prepare yourself for some fancy fingerwork. Some of the work you will do from above the engine, some from through the license plate door, and a little bit from below. In the picture to the right, the pump is behind that single-groove pulley with the belt riding on the top of it. The multi-grooved pulley is bolted on the end of the crankshaft.

    Step 1 – Disconnect the Battery:
    First things first. We will be working near the alternator, so go ahead and disconnect the battery ground strap. The battery is under the front passenger seat. Sure, you could leave it connected, buy why risk it?

    Step 2 – Drain the Coolant:
    Unless you are determined to replace *all* the coolant on your engine, don’t bother following the Bentley procedures for draining your coolant. What I did was remove the hoses from the thermostat housing by loosening the hose clamps and tugging them off. I had a large bucket underneath, T-stat housingand managed to capture almost all of the coolant. As long as you are there, you might as well disconnect the 2 temperature senders. Once the flow of coolant had subsided, I raised the passenger side of the van with a jack under the frame just forward of the rear tire to get more to coolant to drain out. After the flow slowed to a small trickle, I lowered the Van back down on all fours. The point of all this was to get the coolant level in the engine low enough so that none would spill out when I removed the pump.

    Step 3 – Remove the Water Pump Pulley
    The new water pump does not come with a pulley, WP pulleyso the one on the old pump needs to be removed. The pulley is held on to the pump with 3 13mm head bolts. The problem with removing the pulley is that there is no good way to hold the pulley still while removing the bolts. If you have an air compressor, no big deal – just use an impact wrench to “zip” the bolts right off. But here’s a trick for the rest Alternatorof us. First, loosen the pivot and adjustment bolts on the alternator just slightly. Lever against the housing of the alternator to tighten the belt *much* tighter than you would normally do. Re-tighten the bolts on the alternator and place the Van in gear. With the belt that tight, and the transmission in gear, the pump pulley should be held still while removing the bolts. A 13mm combination wrench will work just fine.

    Step 4 – Remove the Coolant Pipes
    There are 2 steel pipes that carry coolant from one side of the engine to the other. Coolant pipeOn the passenger side of the Van, both pipes are secured to the water jacket with bolts or PITA boltsnuts/studs, as pictured to the right. Remove both the bolts and nuts. On the driver’s side, the upper pipe slip-fits into the thermostat housing with an O-ring seal and the lower is bolted to the front of the water pump. It is the bolts that secure the lower pipe to the water pump that will try your patience, seen here to the left. You can just get a 12mm wrench on the bolts, but only about 1/8 of a turn can be made at a time. Take a deep breath, prepare to spend some quality time flipping your combination wrench again and again, and remove the lower bolts.

    Step 5 – Loosen Hose Clamps
    Tstat hoseAfter completing Step 4, you deserve a break, so here’s an easy one. The thermostat housing is connected to the driver’s side cylinder head by a short hose. Loosen the clamps on the hose. You will be removing the water pump and thermoststat housing as a single unit. Now is also a good time to remove the hose that goes from the expansion tank to the top of the water pump. Use a regular pair of pliers to squeeze and and hold the clamps open while you work the hose off the casting.

    Step 6 – Remove Water Pump
    The water pump itself is held on to the WP boltsengine by a single bolt and 2 studs with nuts. Use a 13mm socket with a universal joint and extension to remove these. At this point, there should be Water pumpnothing holding the pump to the block, as seen on the right. Once the bolt/nuts are gone, the pump and thermostat housing assembly can be pulled straight back towards the rear of the Van. You may have to wiggle the assembly to get the hose connection from the thermostat housing to the water jacket to break free.

    Step 7 – Separate Water Pump from Thermostat Housing
    The thermostat housing is attached to the water pump by two long, 13mm head bolts. T-stat boltsI had to apply a little of heat with a propane torch to get the bolts to turn freely. The heat helps expand the aluminum of the housing, which releases the housing’s grip on the bolt. Once free, I used a wire brush to clean the bolts, and a drill bit to clean out the bores in the housing. At this point, the disassembly phase of the project is over. If you were thinking of installing a new thermostat, now would be the best time.

    Step 8 – Clean All Mating Surfaces
    Having clean mating surfaces Old sealerClean surfaceis the key to preventing leaks around gaskets. Nothing worse than putting everything together and seeing a leak! Use a scaper of some sort to remove any traces of old gasket material from the thermostat housing and the mating surfaces for the coolant pipes. The area on the engine where the water pump mounts should also be cleaned to ensure a good seal. On the left, you can see the sealant residue from the water pump. The view to the right shows the same area, after a good cleaning.

    Step 9 – Let the Assembly Begin!
    Start by installing the thermostat housing onto the water pump. Next, put a *very light* coating of RTV sealer (I like Permatex Ultra Copper) in the o-ring groove on the back of the water pump. Push New Pumpthe o-ring into the groove, and smear a *thin* coating on the face of the o-ring. Do not use more than a paper-thin coating of sealer! If you do, the excess sealer can get into your cooling system and clog things up!! Put the water pump and thermostat housing assembly back on the engine, and tighten the nuts and bolt. The next step was the worse part for me. Using a new gasket, re-install the lower coolant tube. The bolts are tricky to line up and get started, but take your time. Once both of those are tightened down, take a break….you will want one! The upper coolant pipe goes in much easier. Coat the o-ring with a little RTV, and slide it into the thermostat housing. The other end bolts to the cylinder head on the passenger side. Reinstall the water pump pulley and alternator belt. Put the belt on extra tight to help while torquing the pulley bolts, then loosen the belt back to normal (1/2″ deflection). Re-install all the hoses and tighten the clamps. Hook up the wires for both temperature senders. You are almost done!

    Step 10 – Adding Coolant & Bleeding Air
    Before adding a single drop of coolant, open the engine-mounted bleeder valve located on the “H” shaped housing above the engine, seen here on the right. This will help prevent air from being trapped in the cooling system. Bleeder valveOnce you have filled the expansion tank, start the engine. Look for leaks at the pump and all of the hose and pipe connections. As the engine is running, the coolant level in the expansion tank will drop. Keep adding coolant until the level does not drop, and you no longer see air bubbles appearing. Close the bleeder valve.The next step is to get any trapped air out of the radiator. Screw the cap on the expansion tank, and turn off the engine. At the front of the Van, remove the grille around the headlights by turning each of the slotted fasteners about 1/2 turn. Jack up the front of the Van a foot or so and restart the engine. By raising the front of the Van, air bubbles should collect in the top of the radiator. Loosen (not remove) the bleeder screw on top of the radiator Bleeder Valve(seen here on the left) until you see or hear air being pushed out. If you see bubbles, then there is still air escaping. Once only a solid flow of coolant is escaping, tighten the bleeder. Get behind the wheel and rev the engine to about 2000 RPM for a minute or so, then loosen the bleeder again and check for air. Repeat this process several times until no more air is being pushed out when you open the bleeder. Shut down the engine and lower it to the ground. Fill the coolant reservior to the top, and put away all your tools, except for the 13mm wrench. As the engine cools, a vacum will develop in the cooling system, which will cause coolant to be sucked out of the reservoir, and into the system. After an hour or so of cooling time, check the coolant level in the reservoir, and fill if needed.

    Once done with the bleeding process, I tend to leave the grille off for a few days. New pumpUpon arriving at work or home, I will leave the engine running and crack open the bleeder valve on the radiator. It usually takes about 4 or 6 times before all the air has been purged from the system, in my experience. My new water pump is working just fine….although without the tell-tale trail behind me, I may have troubles finding my way back home! 🙂