By Tom Carrington
Front wheel bearings are usually “serviced” when the disk rotor, caliper or brake pads are replaced. Servicing the wheel bearings includes bearing removal, cleaning and careful inspection. Worn or damaged parts are discarded and replaced. Grease seals should almost always be replaced during this process. The bearings are then packed with fresh grease and re-installed. The procedure is well within the ability of many home mechanics, and can be accomplished on a single weekend day, with proper planning.
Tools & Supplies Needed:
- 19mm socket and breaker bar
- 11mm flare-nut wrench
- 7mm open-end or combination wrench
- 10″ adjustable wrench or channel locks
- 1/2″ drive torque wrench (must be capable of 125ft-lbs)
- Assorted screwdrivers
- Hammer and assorted punches
- Sturdy jack and jack stands
- 1 8oz tub of High temperature/disk brake wheel bearing grease
- Roll of paper towels or several rags
- 32oz can of brake fluid
- 2 new front wheel seals
- 2 new inner and 2 new outer bearings and races (optional)
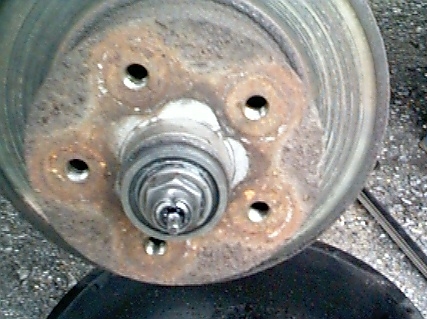
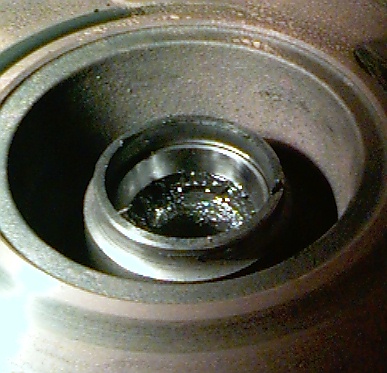
First, loosen the front lug bolts. Jack up and secure the Vanagon so that the front tire is off the ground. Remove the tire from the rotor, and set it aside. On the driver’s side, remove the circlip securing the speedometer cable. Pry off the dust cap, and use the paper towels to clean the old grease out of the inside of the dust cap and off of the exposed parts. You should now be able to see the nut that holds the rotor in place, as pictured to the left.Next, the caliper must be removed in order to get the rotor off the spindle. Loosen the 2 large bolts with a 19mm socket and breaker bar. These bolts are torqued to over 100 ft-lbs, so expect them to be tight! Next, the brake line and it’s bracket must be dealt with. There are 2 basic methods for doing this. One method is to loosen the large nut on the bottom of the upper balljoint. With the nut removed, the brake line bracket can be slid off the balljoint, and the caliper can be hung from the frame with an old wire coat hanger. The advantage to this method is that the brake system is never opened, and the brakes will not need to be bled. The other method is to place a drain pan under the rotor, and remove the threaded brake line fitting from the caliper with the 11mm flare nut wrench. I find this easier than wrestling with the large balljoint nut (see my upper balljoint replacement article for details). If you don’t have a 11mm flare nut wrench, you can use a normal open end wrench on the brake line. Just be careful, as the soft material of the fitting is easy to strip or round off! Once that caliper is off, it’s an easy job to install new brake pads.
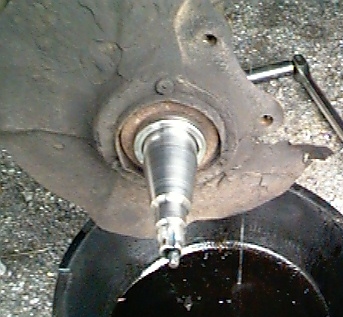
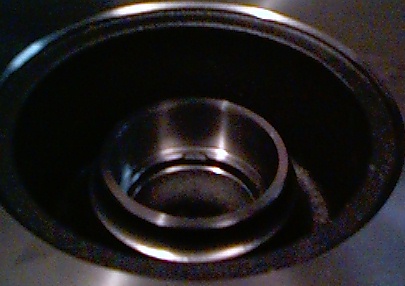
The next step is to remove the nut that secures the rotor to the spindle. If you look closely at the first picture up above, you can see that the round collar on the nut is “peened” to prevent it from loosening. In other words, the nut has been whacked with a chisel. Use a small screwdriver or punch with a hammer to push the collar back into it’s original shape. The nut can then be unscrewed with a large adjustable wrench or channel locks. Once the nut is removed, pull the rotor straight off the spindle. The outer bearing and the thrust washer may fall out as you remove the rotor, so be ready to catch them. With the rotor removed, use some more paper towels to clean all the old grease from the spindle, as pictured to the right. In this picture, you can also see the threaded mounting points for the caliper bolts.
While the outer bearing pratically falls out of the rotor, the inner bearing is retained by the grease seal. To get the inner bearing out, that grease seal must be removed first. Turn the rotor over on it’s back, and pry out the seal with a screwdriver, small pry bar or seal removal tool. With the seal removed, the inner bearing can be lifted out.
Now, it is time for some cleaning. Using your favorite solvent, wash all the grease from the bearings. Use a bunch of paper towels to remove the old grease from inside the rotor. Once all the parts are clean, close inspection is necessary. Check the rollers in the bearings for any signs of pitting, scoring or discoloration. In addition to inspecting the bearings, take a close look at the bearing races. The bearing races are hardened steel carriers that are pressed into the relatively soft cast iron of the rotor, as seen here to the right. They are examined for signs of wear just like the bearings. If there are any serious wear marks on either the bearings or races, they should be discarded and replaced as a set. Do not install new bearings into old races! This can lead to premature wear and/or failure of the new bearing!

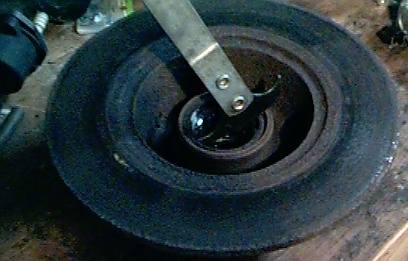
Replacing the bearing races is not too difficult. The only slight challenge is getting the old races out of the rotor. Since I have a slide hammer (pictured to the left) puller in my tool collection, I use it to pull the old races out. The slide hammer works by securing the brake rotor, and then inserting the jaws of the puller into small recesses behind the race in the rotor casing. The weight on the hammer is then forcefully slid the length of the shaft, until the weight impacts the end. The force generated by the impact will pop the race out of the rotor in one or 2 strokes.
If you do not have access to a slide hammer or other puller, the races can be driven out with a hammer and a long punch. The trick to doing this is to strike against the back side of the race, alternating blows on either side. Once again, the small recesses in the rotor casting give you a good spot to strike against. One of these recesses can be seen in the picture to the right, which shows a closeup of the area where the inner race will sit.
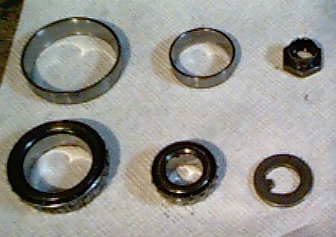
Here is a photo of all my parts laid out on the table. Notice how I have them on a clean paper towel, instead of directly on my grungy workbench. On the far left of the picture is the inner bearing and race. To the right of the inner bearing is the smaller outer bearing and race. On the far right is the securing nut and thrust washer. Missing from this picture is the new grease seal.
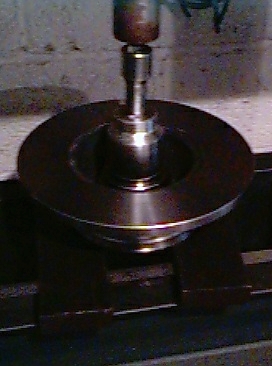
Once the old races are out, the new races can be installed with a hydraulic press. I place a socket that is of a slightly smaller diameter than the race on top, and press against it, as seen in the picture on the right. Another perfectly acceptable method is to use the same socket, and drive the race into the rotor by striking the socket with a hammer. When the race is fully seated, the sound of the blow will change from a “thud” to a more solid sounding “ring”.
With the new races installed in the rotor, it’s time to prepare the bearings by packing them with grease. Force fresh grease into the cavities of the bearings until the grease oozes out from the sides of the rollers along it’s entire circumfrence. The inner (larger) bearing is installed first. Simply drop it into the bearing race. A new grease seal is then installed on the inside of the rotor. The rotor is now placed back on the spindle. Pack in more fresh grease into the void between the rotor and the spindle. Then place the inner on the spindle, and push it into the rotor until it seats. Next comes the thrust washer, and then the securing nut. If you are wondering why there is no picture next to this paragraph, it’s because my hands are too greasy to pick up the camera! While turning the rotor to prevent the bearings from binding, tighten the nut the adjustable wrench or channel locks. The nut should be snugged until there is no wobble in the rotor.
The proper amount of torque is something you have to get a feel for. One test is that you should be just barely able to wiggle the thrust washer with a screwdriver. Also, when installing new bearings, I tend to tighten the nut a little more, assuming that new bearings will “wear in” after a few miles. Once you have the nut to your desired tightness, strike the top of the collar of the nut with a chisel to lock it in place. Don’t forget this step – If that nut gets loose or falls off while you are driving, your wheel could fall off!
With the bearings installed, re-install the brake calipers. Those large caliper bolts get torqued to 100 ft-lbs. If you opened the brake lines to remove the caliper, you will need to bleed your brakes. I’ll cover that process in a future article. Use a hammer to tap the dust cap back on the rotor, and re-install the tire. Once you have the front wheel back on the ground, tighten the lug bolts. Now either move to the other side to finish the job, or if you are done – hit the road! Properly done, you will not need to mess with your front bearings again for many thousand miles.