Vanagon Rear Brakes

By Ken Wilford

Why Vanagon Rear Brakes are Evil and How to make them Good…

Rear brakes on a Vanagon have probably driven me more crazy than any other part of the van. You can put all new brake parts on a van and if you don’t adjust the rear brakes properly your brakes will feel like crap. You can easily improperly install the rear adjusters so that they won’t work, and many of the springs in the rear only go a certain specific way or else they will jam up the adjuster as well. I have learned all of these lessons the hard way. Finally the rear drums can cause major pulsing pedal that you would think is coming from the front brakes because it is so pronounced.

My tips for best performance of rear brakes: Get as much new parts as you can before doing the job. You don’t want to get into the job and not have rear wheel cylinders, etc. that you are going to need.

Rear Drums

I’m not sure if it is really worth turning rear drums. If the drums look smooth on the inside and are within limits then I would clean them with brake cleaner and reuse them but if you have a pulse pedal suspect a bad drum. Replace drums only in pairs. If you have them turned be sure they are only turned in pairs and match each other’s diameter.

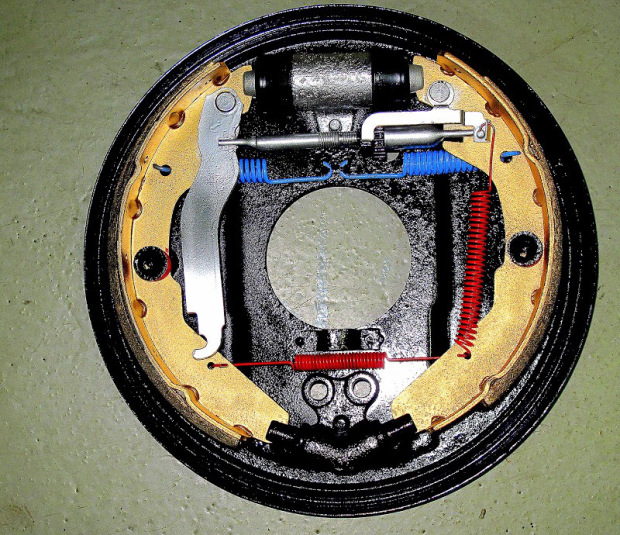
Look at the picture above and at the pictures in the Bentley Manual if you have had poor brake performance and compare it to what is installed on your van. Many times I have found parts improperly installed by a brake shop that didn’t know/didn’t care what they were doing. Pay particular attention to the springs that are directly below the adjuster and rear wheel cylinder. They are made so that the hooks grab the center tabs from underneath. This allows the adjuster to clear. You can easily install them upside down but this jams up the adjuster.

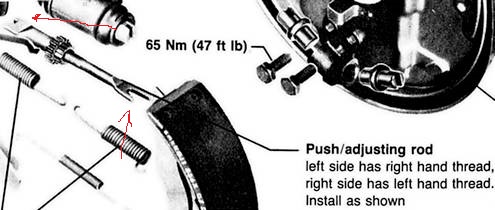
As for the adjuster itself it has two ends, both of which need to be installed properly. One end looks like a split boat paddle with one longer piece and one shorter piece. This end goes toward the emergency brake lever. The longer piece needs to get on the inside of the brake shoe metal plate (toward the backing plate) and the shorter side is out where you can see it. The other end looks like a squared off paddle that is much shorter and squatter. One side is square and the other side has a small notch cut out of it. The squared side should be out where you can see it and the other side with the notch out of it should be behind the brake shoe metal plate (toward the backing plate).

Final adjustment:

Once you have everything properly installed, the final adjustment is the key to getting a high pedal and also a good e-brake. Adjust the brake adjuster until you can’t slide the drum on any longer. Now back off the adjuster in five click increments until you can just put the drum on. You don’t want to have to force it on that is too tight. But when it is on you want to hear a dragging noise when you turn it and also a little bit of resistance. Now go inside and try the e-brake cable. It should only pull up three or four clicks. If it goes higher then you still need to adjust the shoes out a bit farther. Put drums on and then try the pedal. It should feel hard and high. If not adjust some more.

That is it. I properly adjusted set of rear brakes will give you great e-brake, smooth braking and also a high pedal that feels great!

How to remove and replace Vanagon Brake Booster

By Ken Wilford

I thought I would write this up as I just did this one today.

1. Remove cover on instrument cluster and plastic dust cover.

2. Unplug everything and remove the instrument cluster

3. Place something on the floor of the van to catch any brake fluid that will spill out (rags, a pan, etc).

4. Unhook the two steel brake lines on the brake master cylinder with a 11mm wrench.

5. Unplug the rubber feed hose that goes from the brake fluid reservoir to the clutch master cylinder.

6. Undo the two 13mm nuts that secure the brake master cylinder to the booster and slide the MC out. Stop here and you have the removal for just the MC. (Easy).

7. Remove the steel line that attaches to the clutch master cylinder (12mm wrench).

8. Undo the two 13mm bolts that hold the clutch master cylinder and pull it down until it comes out. Stop here and you have the removal of the clutch master cylinder.

9. Remove plastic pieces under steering wheel and under dash around the area of where the booster is.

10. Remove the four 13mm bolts that secure the booster bracket to the firewall (there is one in each corner).

11. Unhook the two bolts that hold the steering column to the dash. Also unhook the two 10mm bolts that secure the other end of the two steel straps that are above the brake booster.

12. Move the two steel straps out of the way.

13. Pick up on the booster and you will get a better look at the rear of it. The pin that holds the booster linkage to the pedal linkage is secure with a cotter pin on the driver’s side.

14. Remove cotter pin and push retaining pin releasing the booster linkage from the pedal linkage.

15. Unhook the four 13mm bolts that hold the booster to the aluminum pedal mount.

16. Unhook the vacuum line on the brake booster.

17. Pick the booster up and out of the dash.

Installation is the reverse of removal. Please print this out and put it in your Bentley. Feel free to offer suggestions to make this How-to better.

How to Remove and Replace Brake Pads on 86-91 Vanagon

By Ken Wilford

A quick how-to on changing brake pads on Vanagons with Girling Calipers (’86-91 including Syncro).

1. Place van on level, hard surface

2. Chock the rear wheels or put on the emergency brake or put it in park.

3. Jack up van (I used the jack that came with the van)

4. Remove the wheel.

5. Remove upper Caliper bolt that is on the backside of the caliper (hold guide pin with 17mm wrench and remove bolt with 13mm wrench).

6. Loosen lower caliper bolt

7. Swing caliper down out of the way.

8. Remove old brake pads.

9. Crack caliper bleeder screw. (7mm wrench)

10. Use a clamp to compress caliper piston (a 6″ wood clamp will work by placing the body of the clamp against the back of the caliper and the screw side against the rim of the caliper piston. Now tighten the clamp until the piston is almost completely compressed- brake fluid will squirt out so have something to collect it with).

11. Before removing the clamp, close the bleeder screw (this minimizes the amount of air that gets into the system).

12. Place new pads in place of old ones.

13. Swing the caliper back over and align with guide pin.

14. Reinstall guide pin bolt and tighten (see Bentley for Torque Values)

15. Replace wheel

16 Lower van

17. Do brakes on the other side in the same manner

18. Lower the van

19. Fill the brake reservoir to Max.(You will find the reservoir under your instrument cluster cover.)

20. Bleed the brakes (have someone pump up the brakes and hold the pedal down. Crack the brake bleed screw on the caliper and you will hear the air and brake fluid squirting out. Have something to catch it in or you will have a mess on your hands. Now with your friend still holding the pedal down close the bleed screw. Repeat this process as many times as is needed to remove all air from the system. Repeat on the opposite side caliper.)

21. Fill the brake reservoir to Max. Do this at your own risk, disclaimer, legal blah, blah, blah.

I crack the brake bleeds and compress the caliper rather than just compressing the caliper piston in order to prevent crap from being forced back up into the brake master cylinder. If you don’t do it this way you could be doing your master cylinder in.