Syncro Solstice 2017

Syncro Solstice 2017:

Friday, May 19 – Monday, May 22

Registration open Monday, March 13th!

There is no Syncro Solstice entity, just a bunch of loosely knit community folks making for this wonderful weekend get together, and we hope you will be part of it.  If this is your first time, we are excited for you to join us. We are expecting over 80 vans to travel who knows how many miles of trails.  Register early, the event will sell out. The Syncro Solstice is non-profit, so any additional funds not used go the the kind BLM folks for having us.  Eurovan, Bus, Doka, Microbus Ford Van friends…all are welcome.

Syncrofest 2017

SyncroFest is a Syncro Vanagon gathering and campout in the Hollister Hills OHV Park.

Although the event’s primary focus is 4WD Syncros, 2WD Vanagons as well as older Type 2 busses are welcome to join in on the fun.

It’s about camping, wheeling, and making new friends.

The Dates

Thursday through Sunday, May 4th – May 7st 2017

The Cost

There are no refunds to the camping or day pass fees, we reserve the right to ask anyone to leave if they are not following the rules (see rules when registering, they will be posted at the event as well).

Camping

$50 Vehicle/Driver
$20 Each Additional Adult (16 and older)
Kids FREE
Dogs FREE

Day Visitors

$10 Adult (16 and older)
No Dogs
Kids FREE

Vangelenos Meet Up

Vanagon Owners Los Angeles Club Meet-up. Every 3rd Saturday of the Month from 10am-2pm at

Crystal Springs Picnic Area
4730 Crystal Springs Dr
Los Angeles, CA 90027

The Picnic area is in Griffith park first right north of the Film Office.

Campouts are posted on the event page on FB.

Hydraulic Lifters, the untold story

By Bob Donalds

There are performance problems that have been traced to the hydraulic lifters that are in some air-cooled and all water boxer VW engines. Among the symptoms are noisy lifters on cold start. However keep in mind that if the van has been parked for a few days one or more lifters can bleed down and this can be the reason for the noise and does not necessarily mean that there are lifter problems. The symptoms of the lifter problems I am talking about in this article are low idle when cold, hard or not starting hot, poor performance when the engine warms up and the power (vacuum) assist brakes may not work as well at times because of the low intake manifold vacuum. These symptoms can be caused by improper hydraulic valve setup. This article is about how to properly setup the vanagon engine with hydraulic lifters. There have been a lot of differing opinions and methods regarding proper setup of hydraulic lifters.

This issue of proper setup has haunted me for years and cost me lots of time, money and peace of mind. In fact one of my own vans would not start hot unless it was push started or it was left to cool off for a couple of hours. This went on for 2 years with no trace of a reason until I understood that it was the lifters.

It’s no understatement when I say I have lots of trouble and limited success with preloading of the hydraulic lifters in the VW busses and Vanagons. In fact I have had lifters that would not take any preloading at all. It has been suggested that because the lifters are installed on their side that they trap air above the check ball that’s in the center of the lower piston that’s inside the hydraulic lifter and I agree. Air bound hydraulic lifters that are preloaded or that are set to O lash (no clearance or preload) do not allow the valves to close completely after the engine warms up. I believe this is due to the air in the lifter expanding as the engine warms up. I now understand that installing new or used lifters pre-loaded (no valve clearance) may NEVER allow the hydraulic lifters to displace the air remaining in the lifter because the plunger’s travel in the lifter body is minimized.

A long time ago I gave up trying to fill the lifters per Bentley and never looked at those pages again until I spoke with Stan at Bentley publishing who pointed out that there are two versions of the lifter bleeding process in the book (on page #15.7 and 15.24). I personally found both descriptions confusing. The first method instructs you to fill the lifter with oil and then install the lower piston using a scribe to bleed off the oil under the piston as you press the piston into place. As for installing the lifter socket into the lifter they don’t tell you that after you get the lower piston in place it travels back up when you let it go of it, leaving no room to install the lifter socket and clip. The second procedure would have you compress the lifter in a press with an old push rod and purge the air as the lifter is submerged in oil. They don’t say the procedure can take as long as ten minutes per lifter and that a hydraulic press is needed. So I, as most people do, put only enough oil in the lifter so I can compress it enough to get the clip installed.

In the Past

    When trying to adjust the valves on a rebuilt engine, or when working on an engine that has had the heads or rockers off for a few days or when replacing lifters I have recommended the following. Set the valve lash to .006″ (i.e. no pre-load). This does two things: first the valves will for sure close all the way when the engine warms up, and, secondly, the piston in the lifter is now traveling it’s full range of movement has a much better chance of pumping out any remaining air. Run the engine for a couple of weeks before trying to preload the valves. Bring the engine up to running temp then let it cool down to the point that you will not burn yourself when you start to work on the engine. While the engine is still warm restart it for no more than 30 seconds and check for any valve noise. If you hear noise, drive the car for a few more days and check it again. Next, remove the valve covers, bring each piston to TDC, and turn the adjuster screws in ¼ to ½ turn. If the valve opens when you turn the adjusting screw in this means the lifter is fully pumped up with oil and you can tighten the lock nut. In most cases the lifters will now self-adjust and allow the valve to fully close and stay pumped up. If instead of the valve opening, the rocker arm moves the lifter as you turn the adjuster, then re-set it to .006ths clearance, reinstall the valve cover, and recheck it in a few days. The idea is to replace any unwanted air in the lifter with oil.

So what’s new?

    In the past week I had a customer call and tell me he had not tightened the bolts on his torque plate – the ones that hold the plate to the converter – and after 1400 miles, and having no luck finding that rattling noise, the final bolt came loose, the engine seized, and the van stopped moving. I offered to help him repair the engine. When he dropped it off I got the rest of the story. It seems that after a highway run of less than an hour at 65 mph he pulled in his drive way and let the engine idle and the oil light came on. He also reported that he thought the engine was down on power. At this point I felt that I might learn something if I took the engine apart. So I offered to do so at no expense to the customer and he agreed.

The first thing I did was to put the engine on the engine stand and install a flywheel and put my cut up bell housing and starter motor on so I could spin the engine and test the oil pressure. The oil pressure was at the low end of the normal range 45pds with 10/30. The next test was the compression test and it was 125 on all cylinders a – little low but still ok. Next step was to look at the rockers and check to see if the customer had preloaded the valves. Some valves had lost clearance while others still had approximately .006ths. I was very surprised to see that some lifters were still soft and air bound because the customer had not reported any lifter noise. When the engine was disassembled I inspected and measured everything. The inspection revealed that the only damage or problem was that the customer had scuffed all four pistons on the load side (the load side of the piston is the side that is pressed against the cylinder wall as it’s pushed down on the power stroke).

I was a little disappointed not to have found more of a problem that would explain the oil light coming on (even though the customer had pushed the engine too fast when it was new). The customer had agreed to buy new pistons and cylinders. I thought that was the end of it with no great discoveries until my engine assembler, John Silva, pulled the lifters apart for inspection. John over filled one of the lifters and could not get the lower piston back down into place and instead of pulling the piston out and removing the oil he tried moving the check ball to one side with a scribe and pushed the piston down with a small screw driver. It dropped down enough to allow him to install the upper lifter socket and clip. The next step is what’s missing from the Bentley procedure. John took the same scribe that was used to release the check ball and installed it in the oiling hole on the side of the lifter body. This held the lower piston down so that he could install the upper socket and retaining clip. Once the clip was in place he tested the lifter by pushing the upper socket. The lifter was hard as a rock indicating that there was no air in the lifter. No other methods that I have tried had these results. This looked promising but I remained skeptical. I asked John to finish bleeding the rest of the lifters in the same way and adjust the rockers to the usual .006″ lash. We would test the compression as usual after the engine was completely assembled. The first compression test showed that we had 135 lbs on all cylinders. Next we preloaded the valves ½ turn and immediately repeated the compression test: some of the valves had not closed so we waited ten minutes and repeated the test. The compression was slightly lower: 125 lbs on all cylinders. Because it was lower we then tested each intake and exhaust port with a vacuum tester to see if the valves were closed and found that all the valves were sealed 100 percent. We next removed the valve cover and checked each lifter by prying on the rocker and looking for movement: all the lifters were still hard as a rock. The next morning we checked for soft lifters and found that the # 2 exhaust valve lifter was soft. We spun the engine again for about one minute using the starter motor and then checked the #2 lifter: it had regained most of its rigidity.

My conclusions

    Lifters can be pre-bled and preloaded at ¼ to ½ turn at the time the engine is being assembled provided that the above-mentioned procedure is followed. However, assembled engines always have at least one or more lifters on the lobe of the camshaft holding them open. Open valves have their springs compressed thereby increasing pressure on their lifters. The increased pressure will cause the lifters to lose oil over time. This can be days or weeks, depending on how clean the oil and the lifter’s check valves are. These engines may not have enough oil available to the expanding lifters when the engine is first turned over during the start up procedure. If the oil galley is empty, the lifter can take in air instead of oil and becomes air-bound. An air-bound lifter may expand as the engine heats up, and thereby prevent a valve from closing. To prevent this, some shops use a pre-oiler. Oil is pressure-fed into the oil galleys before the engine is first started.

So, caution must be used when preloading valves on any new engines. Air-bound lifters are hard to detect. Exhaust valves that don’t close completely when the engine warms up will not transfer their heat to the valve seat, as it was designed to. Instead, this excess heat travels down the valve stem and scorches the oil lubricating the valve stem and guides, drastically reducing their life. I have seen this specific damage time and time again on air-cooled engines as little as 10 K miles.

I consider pre-loading valves to be optional. You may never have had this lifter problem before, but I assure you the potential is high and expensive. While the intake manifold vacuum is an easy way to know if the intake valves are completely closed, the only way to be 100% sure all the valves are closed when the engine is warmed up is to do a cylinder pressure differential test (sometimes known as a “leak down” test) that is commonly done on race engines and aircraft. This test measures air pressure going into a cylinder, and how much air remains. 2%-4% is ideal.

I hope this helps
Bug-a-Palüza 19!

Bug-a-Palüza 19!

April 8-9, 2017

Camp Jordan in East Ridge, TN

Begun in 1999, Bug-a-Palüza has grown from a handful of enthusiasts spending a Sunday afternoon in the dealership parking lot to one of the largest annual VW events in the region. Each year, we have a record-breaking turnout and this year will be no different! Last year we had over 350 show cars, over 100 vendors, and thousands of spectators.

Spectator entry: $5 per person. Children 12 and under get in free! All gate proceeds benefit the Ronald McDonald House Charities of Chattanooga.

Blue vs Green Coolant- Fight!

By Dennis Haynes

To begin I wish to apologize for not keeping up with the list and this discussion. I have been a bit busy and this topic seems to get attention like oil and tires. There is just a lot of information out there and probably the best feature of many products is the advertising.

For my experience I have dealt with cooling systems and water treatment for vehicles and numerous industrial systems. The good, bad, and sometimes ugly. I have been amazed how truly de-ionized water can discolor (rouging) stainless steels.

I have been working on VWs since about 1974 and grew up with the introduction of the VW water cooled stuff and even owned some Sciroccos and an 81 Rabbit convertible before getting into Vanagons. Back in the day due to advertising and perceptions most everything got Prestone Green Stuff. Except for an occasional water pump I never knew I had an antifreeze choice problem. Even my first Vanagon, an 84 GL passenger that I purchased about a year old got the green stuff after a water pump change. I sold it at 96K as I needed $$$ to help acquire Fun Bus. That was February 1988.

So let’s talk about Fun Bus! Yes I still have it and lately been using as a daily driver. I am hoping to get it to 350K. I have less than 38K to go. While I have had to do a number of transmission repairs, (Broke 4th gear twice 3-4 slider hub, and a pinion bearing), the engine has never been opened. Currently you can tell where it was parked by the Mobil 1 dripping from the crankshaft seals, (both now), but it still has proper compression, good oil pressure, and the antifreeze leaks now are mostly the heater cores. I did have to replace the valve covers a few years ago as they rusted out enough to leak. Also, once the Vanagon lifter clatter let the push rod fall out the rocker socket for intake valve cylinder 1. However the heads have never been off.

How often do I change antifreeze? Not very. It seems that during “condition based” maintenance there is always a reason to open the cooling system more often than modern antifreezes need to be replaced. Unlike lubrication frequent additions, top offs, and even excessive coolant changes is not a good thing. Why, when you add fresh coolant or water you are adding fresh oxygen. If you have leaks you are also losing fluid but leaving the bad stuff behind and overtime the bad stuff gets concentrated. So the most important part of cooling system maintenance is to not have leaks. In theory the only loss you should have is evaporation from the recovery tank.

The science! I am sure some folks here have home heating systems with radiators or baseboards. Cast iron boilers, copper pipes, valves with steel parts, etc. They all last for 20 to 30 years and there are no additives used all. Fill the system, let the oxygen purge out, metals or whatever reach equilibrium and the stuff is just there.

Now let’s look at the Waterboxer head gasket failure from corrosion problem. For all those that have worked on these and seen the corrosion on the head and also on the case where the gasket sits have you noticed that the corrosion is only in that area? Well, at that point it does not matter the choice or age of the coolant! The gasket (sealant) was failing long before the corrosion.  That’s right. If the gasket seal was good the antifreeze wouldn’t be there. However, once it is there the heated coolant mixture mixes with air and the corrosion process begins.

So now let’s talk about antifreeze types. Back in 1999 I purchased a new motor home. Ford chassis with the Triton V-10 engine. There were numerous stickers near the coolant tank warning to use only specified fluids and NOT to use Dex-Cool. This took me by surprise. After all Dex-Cool was the long life antifreeze darling at the time. My antifreeze education was about to begin.

Fast forward to 2004 and the motor home gets upgraded to one with a Cat Diesel. Diesels it turns out have a whole different bunch of requirements. So I got to learn about cylinder cavitation erosion and all the additives or special antifreezes that deal with that. Also the need for longer life requirements and less abrasives to extend water pump seal life and reduced internal wear of really expensive radiators and stuff.

OK so back to my experience. Of all the engines and cooling systems I’ve worked the coolants that seems to leave the nastiest stuff inside an engine include Dex Cool and the Blue stuff. The Blue stuff is an older technology and I just don’t see a real advantage of it.  Dex-Cool seems to only work in systems designed for it. Flow velocity has to be part of that system design. As I truly like to reduce maintenance requirements (lazy) I became intrigued with the long life solutions used in the large Diesels and industrial uses. The state of the art for these applications include coolants such as Global Final Charge. These are 6 year, 600,000 mile coolants that only require an additive update at the half life for the cylinder cavitation prevention. These coolants also have great “wetting” abilities which improve cooling performance. The only real downside is that with the lower surface tension if there is a chance for a leak there will be one. Using these in the vanagon seems to also have another benefit, extended water pump life. Since these coolants rely less on abrasives for corrosion control water pump seal life is greatly extended.

Fun Bus and most of my customers now run on this. I also do use the pre-mix. It is convenient and I end up with a more consistent mixture. Yes, there is more cost for the “water” part but I know the mixture is correct. Also for winter fill, I have seen the water and antifreeze fills not get mixed enough and cause freeze damage. Especially if a fill is done and you can’t get the engine running long enough to really get the coolant mixed.

As for adding a wetting additive such as “Water Wetter” these high performance Diesel antifreezes have that covered. Like good oils, use the good stuff and additives are not needed.

Vanagon Rear Brakes

By Ken Wilford

Why Vanagon Rear Brakes are Evil and How to make them Good…

Rear brakes on a Vanagon have probably driven me more crazy than any other part of the van. You can put all new brake parts on a van and if you don’t adjust the rear brakes properly your brakes will feel like crap. You can easily improperly install the rear adjusters so that they won’t work, and many of the springs in the rear only go a certain specific way or else they will jam up the adjuster as well. I have learned all of these lessons the hard way. Finally the rear drums can cause major pulsing pedal that you would think is coming from the front brakes because it is so pronounced.

My tips for best performance of rear brakes: Get as much new parts as you can before doing the job. You don’t want to get into the job and not have rear wheel cylinders, etc. that you are going to need.

Rear Drums

I’m not sure if it is really worth turning rear drums. If the drums look smooth on the inside and are within limits then I would clean them with brake cleaner and reuse them but if you have a pulse pedal suspect a bad drum. Replace drums only in pairs. If you have them turned be sure they are only turned in pairs and match each other’s diameter.

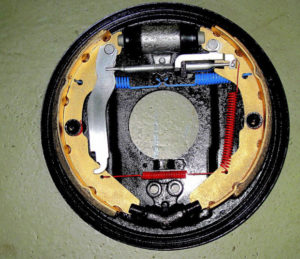
Look at the picture above and at the pictures in the Bentley Manual if you have had poor brake performance and compare it to what is installed on your van. Many times I have found parts improperly installed by a brake shop that didn’t know/didn’t care what they were doing. Pay particular attention to the springs that are directly below the adjuster and rear wheel cylinder. They are made so that the hooks grab the center tabs from underneath. This allows the adjuster to clear. You can easily install them upside down but this jams up the adjuster.

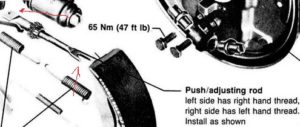
As for the adjuster itself it has two ends, both of which need to be installed properly. One end looks like a split boat paddle with one longer piece and one shorter piece. This end goes toward the emergency brake lever. The longer piece needs to get on the inside of the brake shoe metal plate (toward the backing plate) and the shorter side is out where you can see it. The other end looks like a squared off paddle that is much shorter and squatter. One side is square and the other side has a small notch cut out of it. The squared side should be out where you can see it and the other side with the notch out of it should be behind the brake shoe metal plate (toward the backing plate).

Final adjustment:

Once you have everything properly installed, the final adjustment is the key to getting a high pedal and also a good e-brake. Adjust the brake adjuster until you can’t slide the drum on any longer. Now back off the adjuster in five click increments until you can just put the drum on. You don’t want to have to force it on that is too tight. But when it is on you want to hear a dragging noise when you turn it and also a little bit of resistance. Now go inside and try the e-brake cable. It should only pull up three or four clicks. If it goes higher then you still need to adjust the shoes out a bit farther. Put drums on and then try the pedal. It should feel hard and high. If not adjust some more.

That is it. I properly adjusted set of rear brakes will give you great e-brake, smooth braking and also a high pedal that feels great!

Vanagon Front Shifter Removal and Replacement

By Ken Wilford

You can use this guide to remove your shifter if it is broken or you are just pulling it to install new bushings, etc.

  1. Drop your spare tire under the van. You will see a box directly below where the shifter is located.
  2. Remove the 4 10mm nuts holding it in place and remove it.
  3. Now you will see the bottom of the shaft. There is one bolt going through the bottom of it. Remove this. (10mm wrench and socket or 2 wrenches)
  4. Go back into the cab and pull the rubber boot back from the floor.  You will see the mounting plate where the shifter is mounted to the floor.  It has two holes in it.  Mark these with some white paint so you can put the shifter back exactly the same orientation as the old one.
  5. Now you can go up into the cab and pull the whole shifter up and out of the car as one unit.
  6. Put your new/used one back in the reverse of how you did this one. Be sure to line up the mounting plate holes with the paint marks you made and your shifter alignment should be the same as it was.